Quick & Easy Crispy Oven Baked Shrimp: Your Guide to a Perfect Golden Crust
Tired of soggy, sad shrimp that promise crispiness but fail to deliver? We’ve all been there, pulling a tray of half-naked shrimp from the oven, wondering where that golden crunch went. But what if we told you that achieving truly irresistible,
crispy oven baked shrimp with a perfect golden crust is not just a dream, but an easily attainable reality? Forget the frying pan and excess oil; this guide unlocks the secrets to a healthier, hassle-free, and incredibly delicious baked shrimp that will become your new go-to. Get ready for perfectly coated, incredibly satisfying shrimp that’s a game-changer for quick meals and entertaining alike.
The Secret to Irresistibly Crispy Oven Baked Shrimp: It's All in the Panko
The quest for a truly crispy baked shrimp often ends in disappointment when the breading decides to abandon ship mid-cook. The key to a steadfast, golden crust lies in one superior ingredient and a few precise techniques. Our star player?
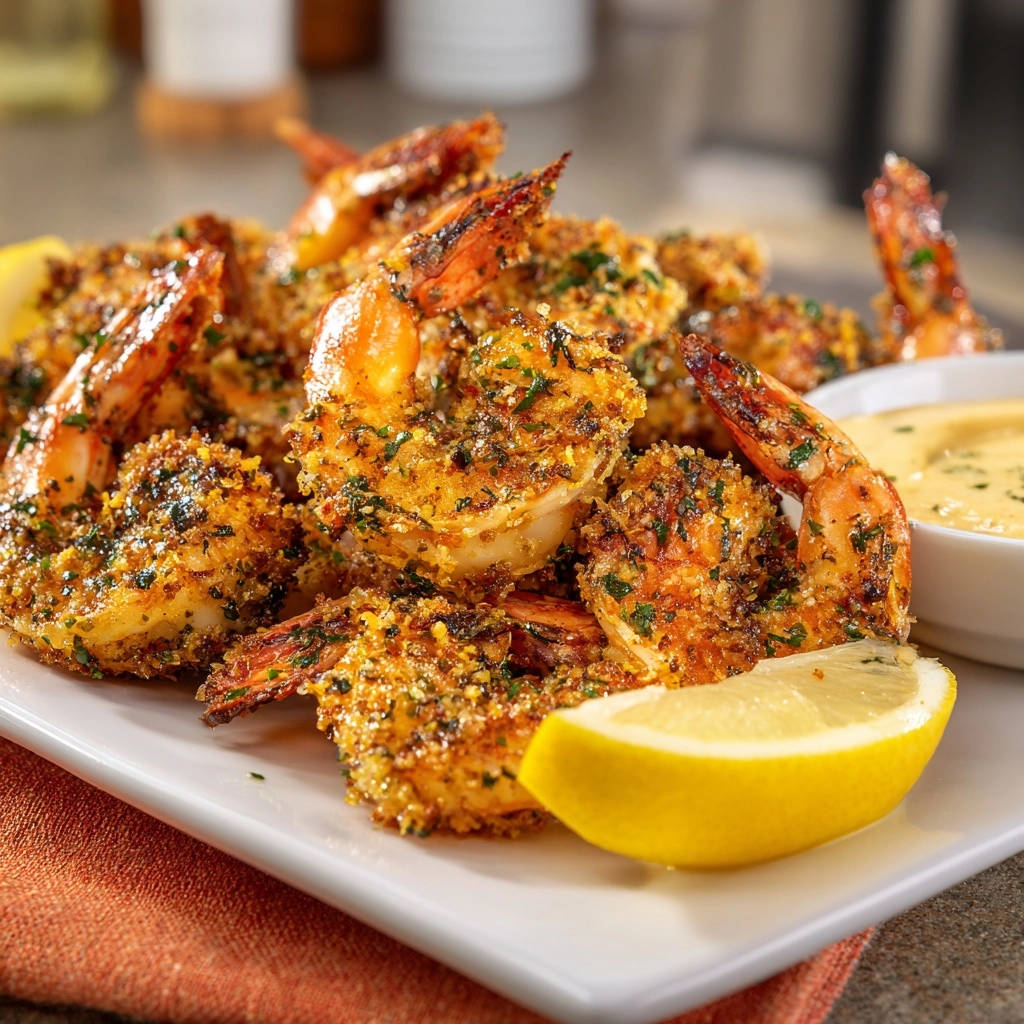
Panko bread crumbs. Unlike traditional breadcrumbs, Panko is made from crustless white bread that is processed into large, airy, flaky crumbs. This unique texture makes them less absorbent, resulting in a much lighter, airier, and significantly crisper coating that stays crunchy long after baking.
To ensure that magical Panko adheres perfectly every single time, preventing the common frustration of a slipping coating, follow these steps:
1.
Pat Dry Thoroughly: Moisture is the enemy of crispiness. Before anything else, ensure your shrimp are completely dry. Use paper towels to pat them vigorously until all surface moisture is gone. This creates a prime surface for the coating to stick.
2.
The Three-Step Breading Station: Set up a classic breading station:
*
Flour: A light dusting of all-purpose flour helps create a dry surface for the egg to cling to. Season the flour lightly with salt and pepper.
*
Egg Wash: Whisk an egg or two with a tablespoon of water or milk. This acts as the "glue."
*
Panko Power: In a third shallow dish, combine your Panko breadcrumbs with your desired seasonings – think garlic powder, smoked paprika, dried oregano, salt, and black pepper. For that melt-in-your-mouth, cheesy goodness, generously mix in grated Parmesan cheese.
3.
Firm Pressure Application: When coating the shrimp in Panko, don't just roll them around gently. Press the shrimp firmly into the Panko, ensuring every inch is thoroughly coated. A good squeeze helps the crumbs embed into the egg wash, creating a robust, intact crust.
By embracing these simple yet critical techniques, you’ll enjoy truly crispy shrimp, not a messy baking sheet or sad, bare pieces. This method delivers a lighter, guilt-free texture without sacrificing that satisfying crunch or rich flavor.
Why Oven Baking Wins: Health, Flavor & Convenience
Traditional fried shrimp is undeniably delicious, but it often comes with a heavy dose of oil and calories. This is where
crispy oven baked shrimp truly shines, transforming a beloved treat into an effortless weeknight reality that’s both healthier and incredibly convenient.
*
Healthier Indulgence: By baking instead of frying, you drastically reduce the amount of added fat. You get to enjoy that incredible crispy texture without the guilt, making it a fantastic option for those looking to eat lighter without compromising on taste.
*
Unbeatable Flavor Profile: The oven baking process allows the flavors to meld beautifully. Our preferred combination of garlic and Parmesan cheese infuses the shrimp with an aromatic, savory, and cheesy punch that is simply divine. When baked at 350 degrees F, the shrimp cooks quickly, staying incredibly juicy on the inside while the Panko achieves that coveted golden-brown, crunchy exterior. It’s crispy, cheesy, and utterly delicious!
*
Effortless Convenience: With minimal prep and a quick bake time, dinner is on the table in under 30 minutes. This makes it a reliable go-to for busy schedules and diverse palates. Whether you're making a light lunch or a satisfying dinner for the whole family, this recipe is simple, easy to make, and doesn’t lack flavor in the slightest. You may just want to make an extra batch because it won't be surprising if they run out fast! For more quick and easy seafood ideas, check out our guide on
Crispy Oven Baked Shrimp: Juicy, Cheesy & Ready in Minutes.
Crafting Your Perfect Crispy Oven Baked Shrimp: Tips & Tricks
Let's dive into the practical aspects of making your perfect batch of garlic Parmesan oven baked shrimp. Beyond the breading, a few extra details can elevate your dish from good to unforgettable.
Essential Preparation Steps:
*
Shrimp Selection: Opt for fresh or frozen raw shrimp, peeled and deveined. If using frozen, ensure they are fully thawed and then *pat them aggressively dry* before breading. Moisture is the enemy of crisp! Medium to large shrimp (31-40 count or 26-30 count) work best for a satisfying bite.
*
Seasoning the Shrimp Directly: Before dipping, lightly season the shrimp itself with salt and pepper. This ensures flavor penetrates beyond the coating.
*
Don't Overcrowd the Pan: For maximum crispiness, arrange the breaded shrimp in a single layer on your baking sheet, leaving a little space between each piece. Overcrowding traps steam, leading to soggy results. Use two baking sheets if necessary.
*
Baking Sheet Prep: Line your baking sheet with parchment paper for easy cleanup and to prevent sticking. For an even crispier bottom, consider placing a wire rack on top of the parchment paper – this allows air to circulate around the entire shrimp.
*
Optimal Baking Temperature and Time: Preheat your oven to a consistent
350 degrees F (175 degrees C). Bake for approximately 10-15 minutes, flipping halfway through for even browning, or until the shrimp are opaque and the coating is golden brown and crispy. Cooking time will vary slightly based on the size of your shrimp.
Flavor Variations and Serving Suggestions:
While garlic Parmesan is a classic for a reason (it will melt in your mouth!), don't be afraid to experiment:
*
Spicy Kick: Add a pinch of cayenne pepper or red pepper flakes to your Panko mixture.
*
Herbal Infusion: Mix in dried herbs like Italian seasoning, thyme, or rosemary.
*
Lemon Zest: A little lemon zest in the breading or squeezed over the shrimp after baking brightens the flavors beautifully.
Serve your crispy oven baked shrimp with your favorite vegetables, or alongside something fresh like a vibrant shrimp avocado salad for a light yet satisfying meal. They pair wonderfully with roasted asparagus, steamed green beans, or even a simple side of pasta with a light sauce. If you’re looking for comforting sides, consider making baked potatoes (or instant pot baked potatoes if you need them fast!) or cheesy Brussels sprouts. And for those nights you want to skip the deep-fryer but still want that satisfying crunch, learn how to
Bake Crispy Shrimp: Enjoy a Golden Crust Without Frying.
Maximizing Your Meal: Reheating & Storage for Leftovers
Okay, let's be honest, we don't often encounter leftovers when it comes to these addictive crispy oven baked shrimp! But just in case you defy expectations and find yourself with a few pieces remaining, proper storage and reheating are key to preserving their deliciousness.
Storing Leftovers:
Store your leftover shrimp in an airtight container in the refrigerator. If stored properly, your baked shrimp can last up to 3-4 days.
Reheating for Maximum Crispiness:
The goal when reheating is to bring back that original crispy texture without overcooking the shrimp. Avoid the microwave if possible, as it often leads to a rubbery texture and soggy breading.
*
Oven Method (Recommended for Best Crispness):
1. Preheat your oven to
300 degrees F (150 degrees C).
2. Arrange the shrimp in a single layer on a baking sheet.
3. For added moisture and to prevent drying out, you can add a couple of tablespoons of warm water to the pan (or use a separate oven-safe dish with water) and then cover the shrimp loosely with foil. This helps rehydrate without steaming the crust.
4. Let it bake for 10 to 15 minutes, or until heated through and the crust is crisp again. Remove the foil for the last few minutes if you want extra crunch.
*
Air Fryer Method (Excellent for Crispness!):
1. Set your air fryer to
300 degrees F (150 degrees C).
2. Spray the bottom of the basket with cooking spray or line with parchment paper designed for air fryers.
3. Do not stack the shrimp; ensure they are in a single layer for best results.
4. Bake for 4-5 minutes, shaking the basket halfway through, or until heated through and crisp. You can also cook for 2 minutes on each side if preferred.
*
Microwave Method (Use with Caution):
1. If you must use a microwave, arrange shrimp in a single layer on a microwave-safe plate.
2. Heat for 30 seconds to 1 minute, checking the middle to ensure it's hot but not overcooked. Be aware that the crust will likely soften significantly with this method.
Conclusion
There you have it – the definitive guide to creating perfectly
crispy oven baked shrimp with a glorious golden crust every single time. By understanding the power of Panko, mastering a few simple breading techniques, and optimizing your baking process, you can effortlessly bring a healthier, incredibly flavorful, and undeniably satisfying seafood dish to your table. Whether served as a quick weeknight meal, a delightful appetizer, or paired with your favorite sides, these juicy, cheesy, and crunchy shrimp are guaranteed to be a crowd-pleaser. So, go ahead, gather your ingredients, and prepare to impress your taste buds and your family with this fantastic, fuss-free recipe! Enjoy!